Search This Blog

Wednesday, April 30, 2008

NEW PIECE - CITY CAT + BOBBIN WORK TUTORIAL - 2

This is a detail of my new piece City Cat. This was created for the "Tampered With Show" at Paper Images Gallery in Picton which will run in June.
After using a facing to make a round hole in my quilt, I strung some washers in the hole using Wonderfill Dazzle, the same thread That I used in the bobbin in the whole piece.
You may wonder how I kept things in place while stitching, and yes you do have to do this by hand.
I used painer's masking tape to hold the sections of the washer in place as I worked around the circle with my stitching. because it is a low tack tape it doesn't gum up the thread and it is easy to reposition.


There he is in all his glory.The horizontal lines are done with 7 mm. silk ribbon in the bobbin. It is lovely and soft and worth the time that it takes to wind by hand.I bought this from Anita who was at our Art in the Islands retreat . As you make the stitch length longer, the finished result becomes wider.
I have also used a hand dyed cotton which worked very well.

BOBBIN WORK 2
Ii you tried it , you may come into a few problems. Here are some hints.

1.If you have trouble getting the bobbin thread up to the top of your work, make a small hole with a tailor's awl and then use that hole to bring up the thread. Works every time.

2.If the top thread breaks, go to a polyester as it is stronger. Generally cotton will work with cotton, but rayon thread is more delicate and you may have to use a polyester to bring up the bobbin thread.

3. In lesson one we put the thread through the tension. Now try the same excersize with the thread out of the bobbin tension. In top loading machine you put the bobbin in and then leave the thread hanging then bring it up through the throat plate of your machine. In bottom loading machines, you will pass the bobbin thread thruogh the larger hole and then bring it up.
This will give you a looser look.

Have fun and remember if your machine makes a funny noise, stop, your machine may not like what you are doing . If everything checks out with your machine,forge ahead. Just experiment and you will learn what works foryou and your machine.

YOU CAN BE AT ONE WITH YOUR MACHINE!!!

Sunday, April 27, 2008

BOBBIN WORK TUTORIAL -1

This is a sample of some of the bobbin work that I demonstrated at our retreat. The regular bobbin threads don't cause too much difficulty, but the fun begins when you use three ply yarn and ribbons up to 7 mm wide.
Once I got home I have continued to work with bobbin threads and have lots to share.

If you are a bobbin work virgin this is how to start.

LESSON ONE

1.Buy some thread such as Ricky Tims Razzle Dazzle from Superior Threads, or Razzle or Dazzle from Wonderfil Threads, or a heavy rayon from YLI, and you can also use Pearl Cotton. These threads are thicker and mostly will not go through through the top tension disc of your machine.
I say most because there always seems to be an exception. When you are at one with your machine sometimes wonderfull things can happen.

2.Hand wind a bobbin with the thread and put it through the tension as always. Thread the machine with a complimentary thread and you are ready to sew.

3.Pull the thread up through the fabric and then you are ready to start.

4.Straight stitching is the easies way to begin and I like to use a stitch length of at least 3mm. This makes the thread look wonderful.

5.Then you can try a zigzag stitch.

6. If you are brave then try a little free motion.

The effect you get is fab as you get a lot of colour from one row of stitching. If you are having some difficulty email me at catelaw@sympatico.ca and I will answer.

Have fun!

Thursday, April 10, 2008

STUDENT WORK

Last night , I had the Wednesday night group come to my house for classes. It is a very casual class and everyone chooses what they want to work on so I keep it small, no more than four students at a time and we have fun exploring all kinds of ideas in my studio.

This butterfly piece was created by Dianne. New to free motion, she has done an excellent job with this piece. The pic sure doesn't reflect how rich the colours are. She also took a big leap of faith and added the red accents to bring it to life, and it certainly worked well.

Then she stretched it on a wooden frame and voila, a piece of art.


Two days ago Sue dropped in excited to show me her piece for the Tampered With Show at the
Paper Images Gallery in Picton. Peggy is a photographer who invites other artists to interpret her work.
Sue's work is fabulous and she really captured the charm of this old barn.Her thread painting makes the old boards of the barn come to life and at this stage she still hadn't completed the quilting. I can't wait to see it all finished and framed.


Friday, April 4, 2008

VISIT TO RENFREW

Hi all,
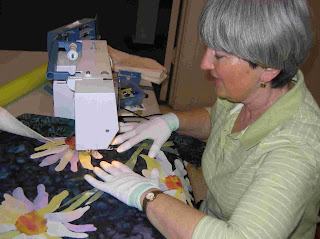
I had a lovely visit in Renfrew with members of the guild. Over two days and braving the bad weather ( freezing rain) each person put their own personal touch on my Three Daisies pattern.
This is Barb in the middle of free motioning the daisies down.She is wearing "machingers" one of my personal favourites to help her grip the fabric.
Here she is holding up her piece, almost finished, her dark background is just lovely,reminding me of a summer's eve. Great job!
Debbie's piece is very dramatic as she had chosen a small dark stripe for her background. This contrast really shows up her work. Sometimes free motion quilting offers up a challenge and although several needles were broken, Debbie persevered and continued to work on her piece. It is stunning!

Janet, who graciously hosted me, wanted a soft piece for her bedroom. Almost a free motion newbie, Janet got into the free motion zone and accomplished a great deal through the two days.
As you can see the background is pieced and this is another great way to show off the daisies.
The soft yellow in this lovely quilt really makes it soft and serene.
Janis who loves a bit of sparkle ,chose a soft brown with little shots of shiny sequin like dots all over it. Her choice of handpainted fabric which had a lot of soft brown in it worked beautifully.I can't wait to see the fin ished piece and I hope that she will send me a pic.

Candice was really brave to come and tackle this project as she was a free motion virgin. After a little practise with free motion basics and a quilt sandwich she was away. Her background which changed in colour was a perfect backdrop for her work. Great work!

Bernie's work was absolutely fabulous. She quietly worked away the two days and just look at what she has done. Below is a closeup of her stitching and it is absolutely fabulious!

Also thanks to JoAnn, who came on the second day as she couldn't get out of her house because of the ice. I will go back for a day in May (no ice I hope) to finish up with everyone. It was a lovely two days for me and it always excites me when other people do fabulous things with my pattern. Thanks ladies!!!